最近玩IPod Touch,挺有意思的, 最烦的是一插上USB cable来充电, 就自动给我备份,而且还挺慢的. 本来就没有什么东西需要备份, 于是想把这个自动备份功能disable掉. iTunes 还不提供这个功能, 于是在网上找了找. 终于给我找到了两个方法.
方法一. Disable Windows上的iTunes客户端.
First of all close ITunes and then follow these steps:
1. Locate your iTunesPrefs.xml file. It’s usually located in C:\Documents and Settings\username\Application Data\Apple Computer\iTunes or C:\Documents and Settings\username\Local Settings\Application Data\Apple Computer\iTunes.
Hint: If the folder Application Data does not show up, make sure that hidden files are visible in the Windows Explorer
2. Backup your iTunesPrefs.xml file
3. Open iTunesPrefs.xml using a capable text-editor (e.g. Notepad++, Ultraedit, but not MS Notepad)
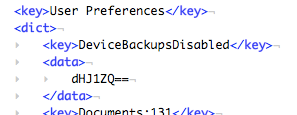
4. Search for a section called User Preferences and paste the following snipped into the User Preferences Section after the first
dHJ1ZQ==
After you’ve done that it should exactly look like the screenshot on the left.
5. Save the file and restart iTunes. Backups should now be disabled. To enable backups again delete the XML Snippet from iTunesPrefs.xml file.
这个方法我试过, 确实可行.推荐!
方法二. 更改IPod Touch/iPhone 的设置,using the strings command in the terminal to disable the backup function.
If you do what I list below, YOUR PHONE WILL NOT GET BACKED UP.
This command will change a hidden setting in the iTunes preferences that will force it to skip the backup process.
1. - Quit iTunes.
2. - Open Terminal.app
3. - Copy and paste this in, then hit return:
defaults write com.apple.iTunes DeviceBackupsDisabled -bool true
4. - Open iTunes
5. - Plug in your iPhone (2.0 or 3G) and sync.
It will take a few seconds, assuming you don't have a ton of music or podcasts.
Changing the 'true' in step 3 to 'false' will re-enable the backup feature.
这个方法我没有验证. 慎用.


没有评论:
发表评论